Thursday 23 November 2017

Facebook Live: More tips and tricks for shooting live video and vlogs

Earlier this week I gave you guys some basic tips and tricks for shooting better live videos (see it here). In this post, I'm going to give you some new tips and tricks, as well as go into more detail on some of the ideas I talked about in the first post. 

1) Camera level

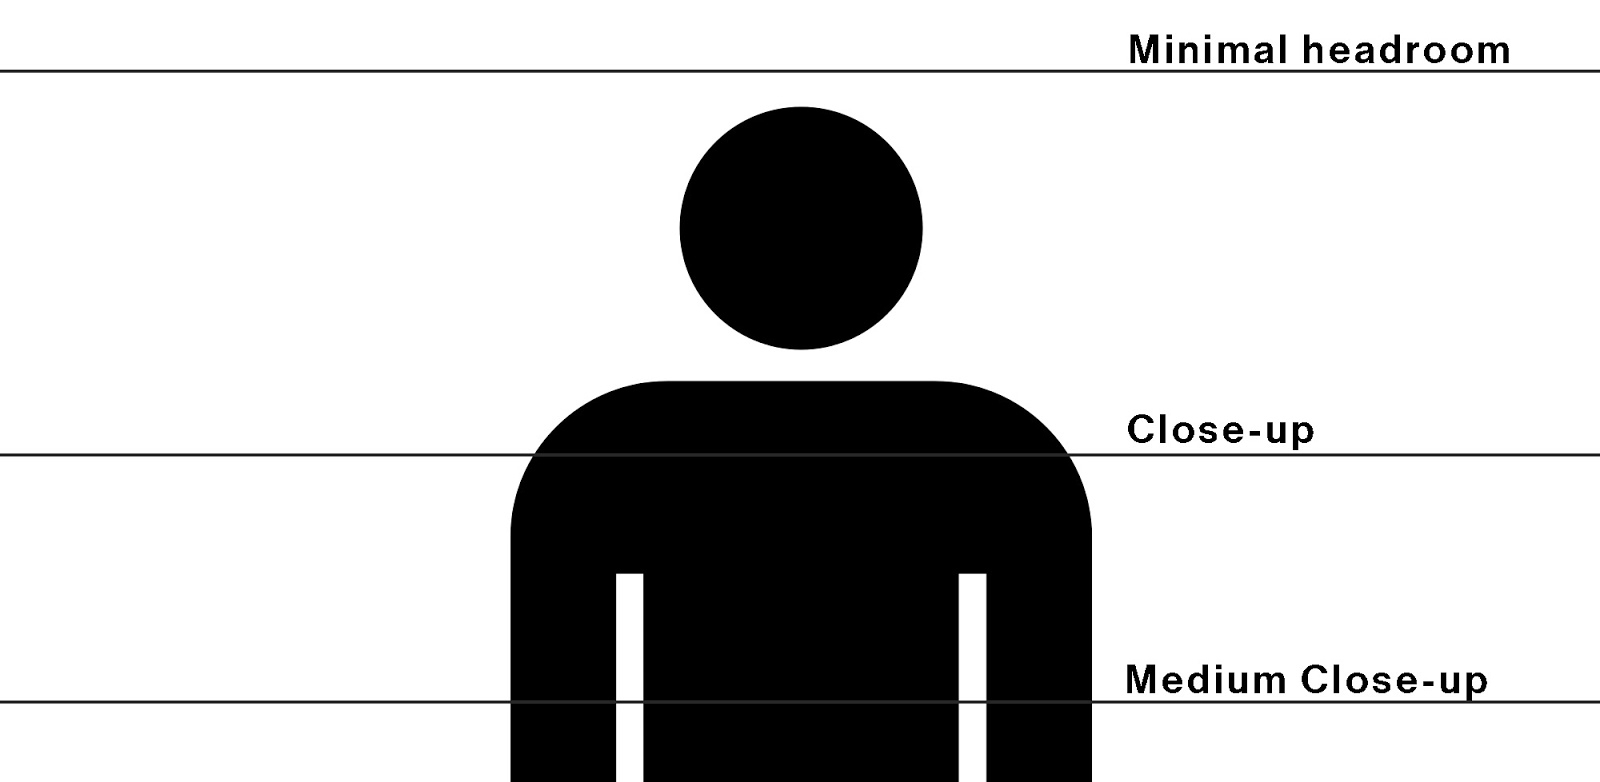
Last time I talked about making sure your shot framing is good. This is just as important:

Position the camera at the same level as your eyes. You don't want to be looking up or down at the camera - doing so can actually create interesting psychological effects on the audience that film makers often take advantage of in their movies (ever wonder how they made Tom Cruise look tall in Reacher?)

For example: if the camera is low and is looking up at you, it can make you seem "bigger", and more "powerful". If the camera is looking down at you, it can have the opposite effect.

You want to keep your viewers comfortable. A general rule of thumb is to have the camera at the same level as your eyes. 


2) Camera position

Getting your camera to eye level might be difficult if you don't have a good way to reposition it. If you're shooting with a point-and-shoot camera, a DSLR or even a proper video camera, they should all have a standard tripod mount on the bottom.

You can pick up a cheap tripod on Trademe for as little as $25. You can even get tripods for smartphones (see here).

Having your camera on a tripod gives you the versatility to easily adjust the angle and height of your camera, which makes it really simple to get the camera to eye level.


2) Better lighting

Lighting. Trying to explain how to achieve good lighting in a blog post would be like trying to get a PHD in 5 minutes. And let's face it, we're not trying to shoot Hollywood level productions here. So how good does our lighting really need to be for vlogs and Facebook live video?

Well, there are a few ways you can improve your lighting easily without going over the top:

1) Find a light.
You can pick up a nice bright LED panel and light stand for around $100-150. These are great as they allow you to adjust the intensity of the light, and often the colour of the light too. But for those that don't want to spend too much, you have options:
- Use a household lamp 
- Use natural light from a window

Both of these options are better than nothing. Keep in mind that when using natural light on a cloudy day, the light may change as you are filming your video - so it can be difficult to control.

2) Bounce light off a wall.
Generally you don't want to point a bright light source directly on your face - it creates harsh shadows and often gives skin a shiny look. Direct your light source towards a white wall and then utilise the reflected light instead. 

There is a lot more to talk about, including white balance and the colour of light, and how to properly expose your camera. But we'll leave that for the next one! 


Monday 20 November 2017

Facebook Live Videos - 5 Tips and Tricks for better quality videos


Facebook live videos are becoming increasingly popular - I see quite a few businesses using them as a daily marketing tool on Facebook. They can be incredibly effective at engaging with your audience - and it's really easy to make them better!


These are just the tip of the iceberg - over the next few weeks I'll talk about more tips and tricks, and provide more in-depth details on how to make your videos stand out. 

Here are 5 tips and tricks on how to improve your live videos:

1) Better audio

There is one simple truth about videos: if you don't have good audio, people won't stick around to watch.

Most people who shoot live videos are doing so with a smartphone or a webcam - both of which generally have poor quality built-in microphones. There are two things you can do to drastically improve your audio quality:

1. If you are using a smartphone to shoot your videos, buy yourself lavalier microphone (example here: https://tinyurl.com/rodelav5). Simply attach the microphone to your shirt, plug it into your phone's headphone jack, open up your preferred recording app, and shoot away.

2. If you are shooting using a webcam, get yourself a USB desktop microphone, or a USB headset with attached microphone. There are numerous options online (brands to check out include Rode, Logitech and Microsoft). 

When the headset/microphone is attached, your recording software should automatically pick it up and use it.

No more bad audio! Easy. 


2) Headroom

This one may seem simple - but it makes a big difference. When you frame yourself up with your camera of choice, make sure you are the focus of the shot! I see too many videos online where the ceiling or the wall are the primary focus in the shot.
For most live videos involving one subject (you) talking to the camera, these are the two best standard shot sizes:

1. Medium close-up: a tight shot, but not uncomfortably close. The bottom of the shot usually sits at the subjects elbows.

2. Close-up: a tighter shot, showing mainly the head. Can be used for more intimate/personal content. The bottom of the shot usually sits mid-neck, or near the top of the shirt.

I hear you asking why this matters. Well, these are two standard shot sizes used regularly in news, documentaries, movies, etc. People are used to how they look - and it will make your video look more professional. 


3) Lighting

A dark shot screams "amateur". I'm not saying go out and buy a professional lighting kit - it can be as simple as sitting facing a window to take advantage of the natural light.
If that doesn't work, try a lamp or any other light source. Simple!


4) Exposure

Does your camera allow you to set manual exposure? If so, I recommend using it! There's nothing more distracting than the camera automatically adjusting the exposure (brightness of the image) constantly while you're talking.
If your camera allows manual exposure, you can set it and forget it!
One exception: If you're walking around or outside where the light is changing, then automatic exposure can sometimes be easier.

5) Length

This one is simple. Say what you need to say in the shortest amount of time possible! You've only got about 10 seconds before most people will get bored and click off your video - so grab their attention straight away!


And that's it for this round... go and make awesome videos!!